Weekend fun with 3D prints

| |
Guess what I m doing this weekend? A little hint:

3dprints for upcoming real brooches

Got a box full of goodies from Shapeways containing 3d prints of some of my Brooch a a Week designs. Some are from early designs, some newer. I am starting to get a feel for what prints well in the low resolution cheaper nylon material. I think this time I only had one model rejected by them for not being printable in that material. Usually there is a little part too small to print requiring remodelling (which I often don't have time for). Or I would have to opt for the more expensive high resolution polymer prints. But I am trying to keep the cost in check since this is just a fun project and not generating sales.

So this weekend I will play with some of these and try to attach brooch findings in some way or the other to make them wearable. Should be fun.

Here a few in more closeup:

Conical Pavilions pattern 3D prints

3d prints in white and coral red nylon of BAD-42 and simple variations of BAD-53/54. Those printed patterns look pretty. They will make nice little brooches. Think I need to send out the others from that pattern series too.


hex20-24

These are 3d prints from my virtual BAD-10 to 24 "Hex Space Rails" 
Those came out better than expected, except maybe the dense version on the upper right. Clearly they print better if there is some space between those rails, otherwise the material just smooches together to one big blob since it's the low resolution white nylon plastic. Now I need to figure out how to attach a brooch pin of some sort.Not an easy one with these. Right now I am drawing a blank here, but I am sure something will enlighten me if I stare at it long enough.


So other than that little fun project I am also planning to work a bit more on my new website (still have to add ton's of products) and check out the Abbot Kinney festival in Venice on Sunday. Plus a little bit of landscaping in my yard is in order, maybe a bike ride to the ocean too and buying fresh veggies at the farmers market.

One-of-a-kind Wooden Ring Box

| |
So you finally found the perfect ring to give, now it's time to think about how to propose to the person you love and want to spend your life with.

You don't need to hire a flash mob to make your big proposal day a special event. That kind of proposal isn't for everyone. Sometimes a small romantic gesture is all that is needed to make your loved ones heart melt and shows them how special they are. You should know them pretty well at this point to have a feel for what they like or not. Taking clues from your happiest moments spent together can be great inspiration. After all you want to make it a very personalized and unique experience. Such clues could be memories form vacations taken together, love letters (or love emails/SMS) you received from your partner, concerts you went to together, your favorite hangout spaces, ... anything that shows them that you cherished every moment you spent with them.

One of my dear customers made a very romantic gesture by crafting a personalized ring box for the ring he ordered from my shop. He had ordered a ring from my Saw Cut collection which has a texture similar to cut wood. Jeff gave it to his partner Phil as an engagement ring along with a meaningful box he made to go with it. He created the box from a piece of wood they found together on a hike in Yosemite.


The piece of wood is so unique and makes a beautiful ring holder with a personal touch. Such a romantic gesture.

The ring he ordered is similar to this Saw Cut wedding band.


Each ring has a one-of-a-kind unique texture just like the grain on each piece of wood is unique. It's a wide rustic wedding band with a carved texture of uneven fine lines that gives it the look of cut wood.

The ring line was inspired by the German wedding tradition of log cutting. After the ceremony is done, the bride and groom have to cut a log placed on a sawhorse. It's the first obstacle the couple has to accomplish in their married life. It's quite an exhausting task done without any power tools. It's especially hard to accomplish considering it has to be done wearing a suite and big wedding dress. This symbolizes their teamwork and shows how well they work together to complete the task.

Jeff's wooded ring box was perfect with the theme of the ring design, although it looks like he did use some power tools when creating his special box.  I really like the 2 nails too keeping the top and bottom perfectly alined.

Please check also out this personalized ring box for a Tourmaline ring.


Brooch A Day, Week 2 Catchup

| |
I took a look through my Flickr set of all my brooches so far for the Brooch a Day challenge and realized that I actually never updated the blog with the process. Time to play catch up and go back in time.

Week 2 did not have any Grasshopper programming work involved. It was all about learning more about brooch mechanism as I have never done any brooches before. I used some objects I had laying around and made them into brooches.
It came in handy that I had some failed 3D prints on hand from earlier design explorations for bracelets. This keeps it still somewhat related to the original intend of using CAD process for some of the brooch making.

Brooch #9 The Wheel Brooch


Those are 3D printed stainless steel miniature bracelets  on my brooch #8 magnetic pin.
I accidentally messed up the scale of these bracelet designs and they are only 1/2 the size (35mm diameter). Too small for any human hand, maybe it would fit a doll.  Rookie mistake in the virtual CAD world ;-) But perfect size for some brooches. Since they are just holding on by magnetic power the arrangement is flexible. 


BAD-009 Wheel Brooch


Brooch #10 Bumpy Rail Brooch


BAD-010 Bumpy Rail Brooch
BAD-010 Bumpy Rail Brooch, back side

One of those accidentally 1/2 sized bracelets that could be napkin holders or, well, a brooch.
3D printed stainless steel, modeled in Rhino/ T-splines. Stainless steel brooch pin and catch welded to ring. Testing out my PUK stainless steel welding settings with these brooches too. Stainless steel welds pretty nicely. The PUK even has a pre-settings for that material. Makes it easy.

Brooch #11 Rilled Pin


BAD-011 Rilled Pin BAD-011 Rilled Pin BAD-011 Rilled Pin

In this one I was using a 3d printed stainless steel bead I had designed earlier in Rhino3D/ T-splines. Perfect for a brooch design. I made a little "flower" bouquet out of some sterling silver head pins and added a thicker wire as the stem. Sterling silver was then oxidized. The 3D printed stainless steel bead is 23mm long, 12mm diameter.


Brooch #12 Rilled Slider Brooch


BAD-012 Rilled Slider Brooch BAD-012 Rilled Slider Brooch

One more of these rilled 3D printed stainless steel bead. Here it slides and spins freely on a steel pin, which is tension set in a welded stainless steel frame. The frame was all welded with the PUK welder. As a brooch mechanism I used some SST tubing, formed catch from sheet and bent SST wire into a double pin.


BAD-012 Rilled Slider Brooch back


The next brooch deserves it's own post. There was no CAD involved at all. But it will be the inspiration for the next weeks Grasshopper practice designs.

Diamond Faceted Rings and Brooch Panel Studies

| |
The other day I was playing with some new new software plugins for my Brooch a Day challenge. These involved using the Lunchbox plugin for Grasshopper to study with paneling components. Some great tools in there that need to get explored further. So I played with those tools a bit on very simple ring shapes too.

I went ahead and CNC milled 2 rings in wax in different width with a diamond shape facet pattern to see how well that pattern would translate into the real world with the tools I have on hand. Cast those in Sterling Silver. The facet edges came out a bit softer after polishing the wax first to remove the light tool path lines and then a light polish and satin brushed finish over the silver rings. I prefer it that way as it looks less machined. A more subtle look. Overall this makes some simple, lightly textured wedding rings with a soft feel. Here the finished rings:


 I am testing how people react to these and listed them on Etsy and my new web site.

There were other panel options too for the rings, here shown in a computer rendering. Panels can be squares, triangles, diamonds, skewed or staggered quads. Could not figure out how the hex panel tool works. Next time.


The Grasshopper definitions for each ring. Pretty simple to use.


So for the brooches I am working along the lines of uneven panel fields with triangular grids maybe.


Or some round brooches with different paneling.


Still needs some work.

Melissa's and Jessica's Rings

| |
I got a really nice surprise note a couple days ago from Melissa and Jessica. I had made their engagement rings last year in Spring and then a couple month ago their matching wedding bands. They brought some happy tears into my eyes by sharing photos from their wedding in August and giving me one of the best thank you notes one can hope for.

What a sweet couple. Congratulations to Melissa and Jessica!
Photo by Dawn Hartman


Melissa wrote: 
"We wanted to drop a line and say thanks again for our beautiful rings. We were married on August 10th, and it was a WONDERFUL day. One of the highlights of the ceremony was when Jessie slipped my wedding band on, and I just stared at it and said "....wow...." -- and then the crowd laughed. ;) "

Ahhhhh, this is why I love my job so much.

Here a couple more photos they shared. These were taken by their wedding photographer Dawn Hartman at www.dawnhartmanphotography.com .

Photo by Dawn Hartman


Photo by Dawn Hartman


The engagement rings I made were done with Fair Trade cushion cut Malawi sapphires from Columbia Gemhouse. Melissa had expressed her wish for a sustainable option for the rings. The palladium for the rings was already recycled precious metal as all the metal I use is recycled.
Luckily I knew of a Fair Trade supplier for the sapphires. The stones Columbia Gemhouse sent me to select from were gorgeous and came in various green to blue shades. After checking with Melissa we went for slightly different color hues for each ring, one has a green-blue sapphire and the other has a darker blue one. Both sapphires were set in a half bezel design from my Fold Collection.


Palladium engagement rings with Fair Trade sapphires which were mined in Malawi.


The matching wedding rings were also done in Palladium. They were custom made as shadow bands to match the side contours of each ring. Jessica got a hammered textured band and Melissa opted for a polished band with 3 flush set recycled diamonds. The diamonds were Harmony diamonds from Hoover & Strong. These 100% recycled diamonds are the ultimate eco-friendly diamonds, as they do not cause destruction to our Earth. This saves on energy and water usage as well as emissions and has a lower impact on the environment to name a few benefits. The diamond melee is painstakingly cleaned, sorted and graded by Hoover & Strong. It's a great way to get some added sparkle for anyone who prefers natural stones over lab made moissanites.

Palladium wedding bands with hammered texture and recycled diamonds
 
It was such a pleasure working with Melissa and Jessica. May their married life be full of laughter and love for each other forever and ever!


Magnification Tools

| |
Amazing how my eye wear in the studio changed over the years. I used to do everything with just some safety glasses on, no magnification needed. Stones were big, settings easy.
The more intricate my work got, the more I needed magnification. My eyes are actually still excellent and I don't need glasses or contacts for everyday normal tasks. But stone settings will turn out so much better with the right magnification.

I really started adding magnification to my tools after taking a stone setting class last February. Before that I mostly used just safety glasses for grinding and polishing work and my Optivisors with different magnification lenses for stone setting. But I got the feel that I needed more enlargement to really see whats going on with my setting. Nothing worst than having just finished ring, just to realize when taking photos that the setting is not perfect. Taking photos of ones handmade jewlery can be a real eye opener. It shows every little flaw the normal eye view can't even pick up.

I was hoping I would just get used to using a hand held loupe with 10x magnification for stone setting. That's what's taught during Blaine Lewis  Comprehensive Stone Setting class at New Approach School, a highly recommended class for anyone wanting to get better at stone setting.
But I really needed my hands free to do the actual stone setting. Using a loupe felt bothersome. Most of the magnification tools like glasses, bifocals and the likes only give a 2x to 3.5x magnification. Not bad, but not great either when dealing with stones less than 5mm dimensions, especially with fancy cuts.

Then I watched Blaine Lewis do his class tutorials with a microscope with super magnification  shown to his students on big monitors. All I wanted at this point was a microscope. So back from class I took the plunge and got a highly recommended 
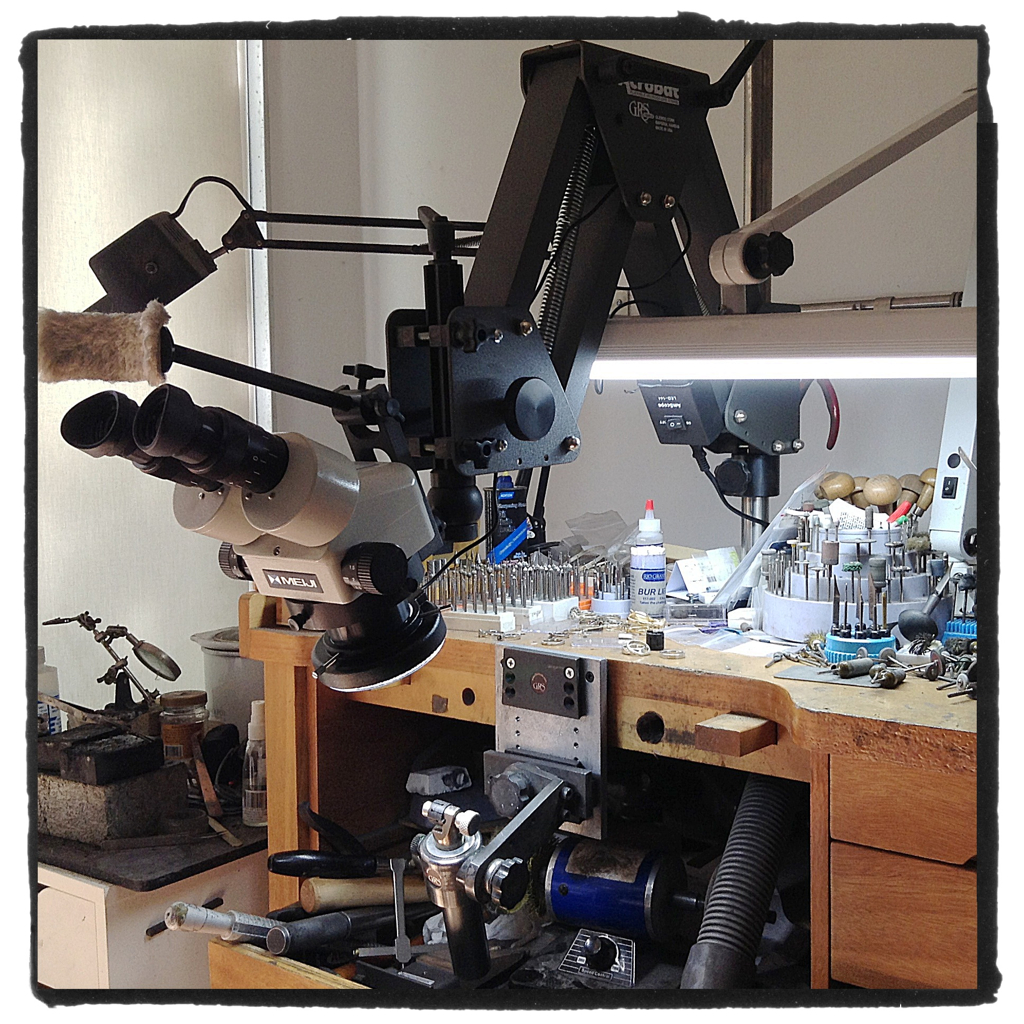
Meiji one to test. After playing with it for a a couple days I was hooked. Such a game changer when at once you can see things at a 7x to 45x magnification.

Meiji Microscope at metal working bench. Yes, my bench is always messy.

All over sudden one can see the tiny movements the metal of heavy bezel walls makes when hitting it with a setting hammer. Flush setting small 1mm diamonds is a breeze with the right magnification. I even felt compelled to try pave settings just because I could actually see what I was doing. One can really see if a stone setting is really closed safely over the stone's girdle. This means fewer lost stones, less stone breakage during setting, quicker finished stone setting tasks. Plus more beautiful settings equals better photos and more sales in the end.

A microscope is a huge investment but I think it's money well spend. I had to also add an adjustable bracket for my bench mate to bring down the ring clamp. This keeps the right distance to the microscope and a comfortable sitting and ergonomic head position. Getting used to working with a microscope was pretty easy. I think it also improved my posture at the bench, greatly reducing any occasional back problems.

I recently added a second cheaper microscope at my wax bench. Haven't really tried it out much yet. It feels a bit more awkward to use at first, but it should get better once I figure out the right setup. I was using the one at the metal bench more and more when carving waxes and it seemed to make stone setting a lot quicker after casting. So having one at the wax bench should save more time as I don't have to move around so much. Also got an extra LED light for the Meiji from AM Scope since it was a lot cheaper than the one offered through Otto Frei or Rio . It's a lot nicer now with this adjustable ring light.

I still use my Optivisor with #5 (x2.5) and #10 (x3.5) lenses for some tasks like polishing and grinding. They work pretty good but I sometimes hate the head band thingy. Leaves me with a bad hair do after a full work day and a sweaty and dirty forehead especially in hot summer months. But they work apparently great for people who wear glasses to correct other eyesight issues and just need to add some magnification.

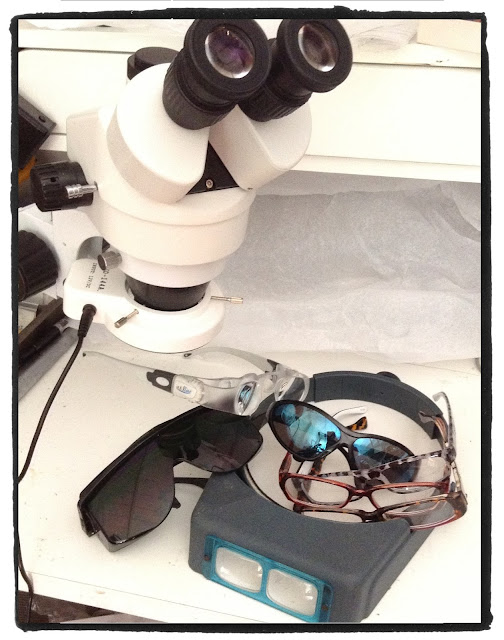
Wax working microscope, Optivisor, 2.5x readers, safety glasses for casting and welding.

A couple cheap +2.5 drugstore readers come in handy too for those tasks only needing some safety glasses  with minor magnification like general work with the Foredom flexshaft tools and soldering. I keep misplacing these readers, so fancy frame colors help finding them easier in my mess. I wish they would make some with glow in the dark frames for easy locating at the end of the work day.

I also have some Eschenbach glasses that I can't get used to working with. The field of vision is smaller than with the Optivisor. The 2X magnification isn't really worth it and the 16 inches working distance is too far away for me for jewelery work. Each lens has a dial that allows for adjustments and for a change in focal length, which is great but still not really useful for me. They do work great if reading a book or working on a laptop where the working distance is more constant. But I don't really need magnification for those things yet. Maybe I use them more in a couple years when my eyesight takes a plunge.

I still use some plain safety glasses at the polishing machine, dark glasses for casting and dark welding glasses for palladium soldering. All those don't have magnification.

Finding the right magnification tools can be tricky for some jewelers who have to deal with certain eye sight issues like astigmatism or nearsightedness. Testing out a lot of those really helps finding the one that feels comfortable.  

Handmade Proposal Box for a Tourmaline Ring

| |
I love when customers share their proposal stories with me. It feels great being a part of their big moment. I especially love when they send me pictures of the new ring on their loved ones hand.

One of those very special Thank You notes I received in April was from Clinton. He created a personalized proposal box for the ring I made. He took some previous hints from his girlfriend Geraldine to his heart about her loving something handmade from him. Here is his sweet box:


The quote in the card is from an email she sent him a while back. So thoughtful and romantic. What a sweet couple. I am sure she said yes.


The ring that's in the box has a stunning raspberry color Tourmaline set in 14k yellow gold.


I have to say I really love the warm color combination of pink tourmaline and yellow gold. It was a real treat to my eyes to work with it. Such uplifting colors.

Here the ring in process:

The design was carved in wax and then cast in 14k yellow gold.
Carved wax models are mounted on a sprue base as a preparation for casing. His ring is on the far right, the single wax model on the base.
All rings cast in various precious metals. His ring is the yellow one in the center.

Then starts the tedious process of grinding, sanding and polishing before it's time to prepare the setting for the stone.
Sanded and pre-finished ring.
And the finished ring:


Related Posts with Thumbnails