New Tool Love

| |
I am in love... with a new tool. Don't know why I waited so long to get it.
Now that it's here with me, I can't imagine how I lived without it.
All this excitement is about this baby:


GRS Bench Mate system with stone setter kit. 

The GRS Bench Mate basically a vice. I know, kind of strange to get so worked up over just a vice. But it makes my life so much easier. Rings stay put while setting stone. No more cramps in the hands when trying to grip tightly to a piece.  And there are so many accessories available. It can be converted into a bench pin, a soldering station or even a belt sander with some extra equipment. I did not get the belt sander or soldering accessories as I like to have my separate soldering station on the side of the bench. But the inside ring holder is great.

All the pieces just out of the box


A mounting plate gets screwed on the face of the bench and then the pieces just slide into the bracket. It's super fast to exchange the vice parts for the bench pin. (Sorry, it is kind of messy under my bench as usual.)

There is a inside ring holder as shown and a second vice type holder for clamping pieces.  The holders move easily in every direction or can be locked in any position.

I find the arm rest on the right a bit uncomfortable. Would be nice if it would be slightly padded to give more comfort for my wrist. But I guess could easily put a small leather or neoprene piece on it to provide just that. 

It was so much fun stone setting with this new vice that I set most of the rings that were piling up for weeks. 


Summer is finally here!

| |
Summer made it finally to the west side of Los Angeles. Ok, it's basically always summer here, or maybe more like spring the entire year. But June usually brings some winterly vibe with this never ending "June Gloom" going on. The coastal morning cloud was hanging over my neighborhood almost every day. It is a bit depressing having to wait for the sun until 1 or 2 pm every day. Now it seems to be over and the sun is out early in the morning.

This is the time my veggie garden comes to life. The few patches I have to plant around the house only get sun until the early afternoon. Most veggies need 6 hours of sun minimum. With that in mind I decided this year to go vertical to double the garden real estate and used hanging planters. I bought the commercial pods even if it would have been pretty easy to built some myself from big plastic buckets.

Hanging planters with upside down tomatoes. 
The 6'-6" long wood planters below are built from 2" x 12" x 8' pine planks. Just have some one at Home Depot cut 18" off the 8' plank and screw it all together at home. Cost about 30$ in materials per planter. Fill with good garden soil for lush growth. The little trellis pieces are there to keep my dogs out of planters. They love taking a nap on warm soil.

Those hanging pods have the advantage that my dogs don't get to it. Lena loves picking fresh fruit and vegetables right from the plants, just a few days before they are ripe enough for me to pick. Last year I barely ever had any red tomato, only plenty of green ones. Tomatoes are her favorite but she also snacked on zucchinis, eggplants and strawberries. At least I have healthy organically fed dogs.

Here Lena during her morning stretch.

Chillies and Peppers seem to like the hanging platers quite a bit.

Tomatoes don't really like to grow down wards, at least not mine and honestly I don't blame them. All my tomatoes plants in the wood planters are way bigger and look healthier. I also planted herbs, eggplants and even zucchini in the hanging pods and they seem to do ok - not great, but ok.

Strawberry pod with some mint.


Linen shoe rack converted into vertical herb garden. Plants don't really grow lush in there but they survive. The pockets need water every day as they dry out really fast. 

I love the large bright yellow zucchini flowers.

My first mandarines are about to be ripe too.


I probably still have to go to the Farmers Market for the next couple weeks before some of those veggies should ripe enough.  Maybe next year I try to use my flat roof as a veggie garden as this would get sun all day long. I only have to figure out how to bring the soil and planters up there and extend the drip irrigation to the roof. I am a bit concerned about the weight those planters would put on the roof. Not sure yet if  that will be a good idea anyways.


Handmade or the Art of Getting Dirty

| |
I do love to get my hands dirty. Let it be jewelry making, building little projects around the house or digging in the dirt in the garden. There is something very satisfying about using your own hands to create things, way more fulfilling than moving the computer mouse around. Handmade means dirty hands to some extent.

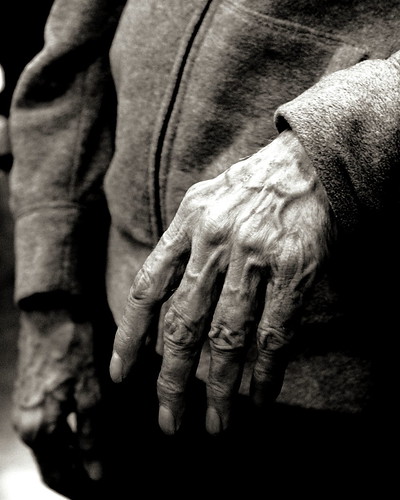
Jeweler Hands

These hands are always rough, never really clean. Polishing compound seems to be burned into the skin pores. Soon enough I won't have any finger prints anymore because I tent to polish off the skin when finishing a ring. Hands that have cuts, nicks, burn marks and bruises. They hurt after a productive day in the studio. They get a treatment in a hot paraffin bath on some days if the pain gets too much (highly recommended mini spa treatment :)).

If I continue jewelry making for the next 30 years I imagine my hands to look like these:

Jeweler's Hands

Beautiful photo by Yellow Sky Photography : Jeweler's Hands - Hands that made jewelry for 35 years. These days they spend most of their time holding mugs of hot coffee.


PS: Love his sweater too, looks very comfortable.

Making of Custom Square 1 Rings

| |
I am working on a custom order for a engagement/ wedding ring set from the Square 1 collection. The rings are to be done in 18k white gold with yellow gold settings and 4 to 5 rough diamonds instead of 1. They still include the rings with the orange and green sapphire.
The square settings I usually use with the silver rings are only available in 14k gold and making them by hand did not work out so well without having a square bezel punch set.  I did a couple tries with silver bezel but I could just not get them perfect enough to be happy about them. Since the rings will be done in such an expensive metal, I want them to be absolutely perfect and not wast any gold in making them.

I decided to use some of my still very limited 3d modeling skills that I gained through the RAW challenge and modeled the rings and settings in Rhino3D.


The advantage is that especially the underside of long setting now matches exactly the curve of the ring and fits like a charm. And the seats for the faceted stones in the small square settings are perfectly even. I did model a couple alternate settings for 3 or 4 rough diamonds to be able to play around with the design a bit more and offer more choices in the future.

Then had them 3d printed on one of those really high resolution wax printers. It cost a lot more than the printing available through firms like Shapeways or Ponoko, but it's worth it since it requires less sanding to get the parts smooth. And I needed very crisp edges. Thats how they look in printed wax.

Glad the diamonds and sapphires actually fit in there. 


The longer settings are really fragile in this state and break easily as one can see. I should have modeled the casting sprues (gates) already on them to be able to handle them better. Lesson learned.

After smoothing the sides of the rings a bit with fine sand paper they went off to my local caster. I can't cast Palladium White gold in my studio as the equipment does not go up to high enough temperatures. I also did not want to take a chance with the yellow gold settings and sent them out too. 
Luckily it only took 2 days for Precious Metals West to get them back to me. They got most of the settings cast without braking them, yeah! That is how they look after casting without being polished. 


Now I will spend my weekend with filing off the rest of the casting sprues, cleaning and sanding all parts and soldering the settings to the rings. Then stone setting and final polish. I will post the final rings when they are done. 

More photos can be seen on Flickr.


Etsy Metal Studio Tour

| |
June's Blog Carnival Topic: "Etsy Metal Studio Tour" 
Show us where you work! 


This is my messy studio with the outdoor extension. 


I converted this office room into my metal studio and I am loving every bit. The bench is right next to the sliding door to the patio and gets lot's of light. When I am in the studio the door is always open. Right now thats my only ventilation system. Luckily living close to the beach in LA, the climate is most of the time nice enough to just keep it open. But I really need to invest in a dust collection fan system in the future. I don't do a lot of work inside that creates fumes, I don't solder much since I do most work in the waxes before casting and the kiln for the casting burn out during is outside. The metal dust from grinding and filing is really my only concern. A dust collector is high up on my tool wish list.


Earlier this year I set up my vacuum casting equipment in the studio and moved out the computer to make more space. I love that I can now have more control over the timing of my castings. It also let me to try out a few more ideas and some tests with casting organic material like these found twigs. 


If something does not come out well, it just gets melted in the next casting run. Another advantage is that I can recycle a lot of my clean scrap silver, which was nice when the silver price started to skyrocket a few weeks ago. Sending castings out to a outside caster cost a lot in labor charges. I would have thought twice about testing so many new designs in the last few month. However the equipment was expensive and I still have to see how much my energy bill went up due to running the kiln and melting furnace almost every weekend. I only regret that I can't do any castings with palladium alloys, my new favorite metal, as the melting temperate of palladium white gold and palladium exceeds the temperature range of my melting furnace and kiln. Casting palladium does require some special equipment anyways, so its better keep that for those professional casters.


Please take a walk through the studio's of these other Etsy Metal Artist's


Rebecca Bogan - http://www.AdobeSol.com/blog
Shirlee Grund - http://lichenandlychee.com/blog/
Beth Cyr http://bcyrjewelry.blogspot.com
Elizabeth Scott http://esdesignsjewelry.com/blog
Cynthia Del Giudice http://cynthiadelgiudice.blogspot.com
Michele Grady http://www.michelegradydesigns.blogspot.com
Erin Austin - http://metalmusing.blogspot.com/
Evelyn Markasky -- http://markasky.blogspot.com/
Kathryn Cole - http://www.kathryncolejewelry.blogspot.com
2Roses - http://www.jewelrytutorial.blogspot.com
Lauren Anabela Beaudoin/Creative Dexterity - http://creativedexterity.com/Blog/main.html 

.
Related Posts with Thumbnails