Magnification Tools

| |
Amazing how my eye wear in the studio changed over the years. I used to do everything with just some safety glasses on, no magnification needed. Stones were big, settings easy.
The more intricate my work got, the more I needed magnification. My eyes are actually still excellent and I don't need glasses or contacts for everyday normal tasks. But stone settings will turn out so much better with the right magnification.

I really started adding magnification to my tools after taking a stone setting class last February. Before that I mostly used just safety glasses for grinding and polishing work and my Optivisors with different magnification lenses for stone setting. But I got the feel that I needed more enlargement to really see whats going on with my setting. Nothing worst than having just finished ring, just to realize when taking photos that the setting is not perfect. Taking photos of ones handmade jewlery can be a real eye opener. It shows every little flaw the normal eye view can't even pick up.

I was hoping I would just get used to using a hand held loupe with 10x magnification for stone setting. That's what's taught during Blaine Lewis  Comprehensive Stone Setting class at New Approach School, a highly recommended class for anyone wanting to get better at stone setting.
But I really needed my hands free to do the actual stone setting. Using a loupe felt bothersome. Most of the magnification tools like glasses, bifocals and the likes only give a 2x to 3.5x magnification. Not bad, but not great either when dealing with stones less than 5mm dimensions, especially with fancy cuts.

Then I watched Blaine Lewis do his class tutorials with a microscope with super magnification  shown to his students on big monitors. All I wanted at this point was a microscope. So back from class I took the plunge and got a highly recommended Meiji one to test. After playing with it for a a couple days I was hooked. Such a game changer when at once you can see things at a 7x to 45x magnification.

Meiji Microscope at metal working bench. Yes, my bench is always messy.

All over sudden one can see the tiny movements the metal of heavy bezel walls makes when hitting it with a setting hammer. Flush setting small 1mm diamonds is a breeze with the right magnification. I even felt compelled to try pave settings just because I could actually see what I was doing. One can really see if a stone setting is really closed safely over the stone's girdle. This means fewer lost stones, less stone breakage during setting, quicker finished stone setting tasks. Plus more beautiful settings equals better photos and more sales in the end.

A microscope is a huge investment but I think it's money well spend. I had to also add an adjustable bracket for my bench mate to bring down the ring clamp. This keeps the right distance to the microscope and a comfortable sitting and ergonomic head position. Getting used to working with a microscope was pretty easy. I think it also improved my posture at the bench, greatly reducing any occasional back problems.

I recently added a second cheaper microscope at my wax bench. Haven't really tried it out much yet. It feels a bit more awkward to use at first, but it should get better once I figure out the right setup. I was using the one at the metal bench more and more when carving waxes and it seemed to make stone setting a lot quicker after casting. So having one at the wax bench should save more time as I don't have to move around so much. Also got an extra LED light for the Meiji from AM Scope since it was a lot cheaper than the one offered through Otto Frei or Rio . It's a lot nicer now with this adjustable ring light.

I still use my Optivisor with #5 (x2.5) and #10 (x3.5) lenses for some tasks like polishing and grinding. They work pretty good but I sometimes hate the head band thingy. Leaves me with a bad hair do after a full work day and a sweaty and dirty forehead especially in hot summer months. But they work apparently great for people who wear glasses to correct other eyesight issues and just need to add some magnification.

Wax working microscope, Optivisor, 2.5x readers, safety glasses for casting and welding.

A couple cheap +2.5 drugstore readers come in handy too for those tasks only needing some safety glasses  with minor magnification like general work with the Foredom flexshaft tools and soldering. I keep misplacing these readers, so fancy frame colors help finding them easier in my mess. I wish they would make some with glow in the dark frames for easy locating at the end of the work day.

I also have some Eschenbach glasses that I can't get used to working with. The field of vision is smaller than with the Optivisor. The 2X magnification isn't really worth it and the 16 inches working distance is too far away for me for jewelery work. Each lens has a dial that allows for adjustments and for a change in focal length, which is great but still not really useful for me. They do work great if reading a book or working on a laptop where the working distance is more constant. But I don't really need magnification for those things yet. Maybe I use them more in a couple years when my eyesight takes a plunge.

I still use some plain safety glasses at the polishing machine, dark glasses for casting and dark welding glasses for palladium soldering. All those don't have magnification.

Finding the right magnification tools can be tricky for some jewelers who have to deal with certain eye sight issues like astigmatism or nearsightedness. Testing out a lot of those really helps finding the one that feels comfortable.  

Handmade Proposal Box for a Tourmaline Ring

| |
I love when customers share their proposal stories with me. It feels great being a part of their big moment. I especially love when they send me pictures of the new ring on their loved ones hand.

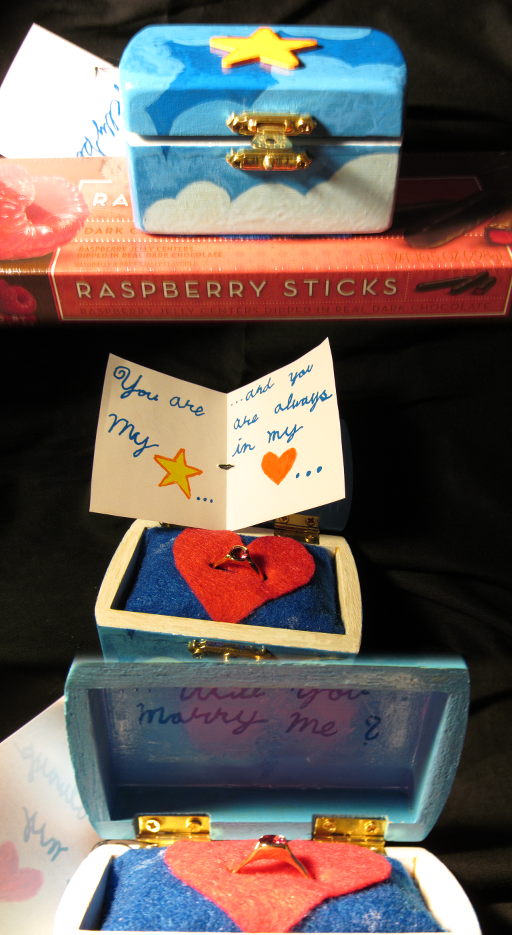
One of those very special Thank You notes I received in April was from Clinton. He created a personalized proposal box for the ring I made. He took some previous hints from his girlfriend Geraldine to his heart about her loving something handmade from him. Here is his sweet box:


The quote in the card is from an email she sent him a while back. So thoughtful and romantic. What a sweet couple. I am sure she said yes.


The ring that's in the box has a stunning raspberry color Tourmaline set in 14k yellow gold.


I have to say I really love the warm color combination of pink tourmaline and yellow gold. It was a real treat to my eyes to work with it. Such uplifting colors.

Here the ring in process:

The design was carved in wax and then cast in 14k yellow gold.
Carved wax models are mounted on a sprue base as a preparation for casing. His ring is on the far right, the single wax model on the base.
All rings cast in various precious metals. His ring is the yellow one in the center.

Then starts the tedious process of grinding, sanding and polishing before it's time to prepare the setting for the stone.
Sanded and pre-finished ring.
And the finished ring:


Etsymetal Bog Carnival - Photography Tips

| |
This month members of the Etsymetal team share their photography tips and tricks. 
What are your photography secrets?! Any tips, tricks, what works best for you, what doesn't? How often do you photograph your work? Do you have an expensive set-up or a homemade one. Your best piece of advice for photographing jewelry. Show us some of your best photos.

When it comes to selling jewelry online photos are the most important selling tools. For customers it's all they have to visualize a piece and make their buying decisions. How you photograph your art can also set a style of branding for your business or shop. When I look at Etsy shops I usually prefer the ones that have a cohesive photography style. It does not mean every single shot has to look the same. In contrary. That would be quite boring and probably make me move on very fast. But the photos should look good together on a page. They should pop and be inviting even in small thumbnail views. Different angles of the work is nice. Often art pieces have a more photogenic side. It takes trial and error to find the right angle that brings out the beauty of the piece best.

I photograph my work almost daily now. Whenever I finish a piece it gets shot to be listed online. I also photograph all custom orders before they ship to document the outcome. I usually take photographs in the evening after being finished in the studio and when my hands are all clean again from the daily dirty work.
I use a light tent, multiple daylight lamps, a Nikon D50 SLR camera with a macro lense set on a tripod. The light tent gives the right light diffusion and blocks out most reflections from surrounding objects. Taking pictures of jewelry is challenging especially when it is highly polished. It becomes a hassle to try to eliminate unwanted reflections.


photo setup
Photo set up with multiple lights, a diffusing tent, tripod and camera

I have to say the lights are the most important tool. I started first with a lower priced setup of 12" tent with some studio lights with daylight bulbs. It worked well for a couple years but I was still getting the feeling I needed more lights. The previous small setup I used on my dining room table when needed. This became quite a hassle putting it up and down every day, I needed a permanent setup for some quick shots.
So a couple years later I set up a permanent spot for my photography and got floor lamps with soft boxes and reflectors. They really blast the tent with light which helps especially with the dark backgrounds I use.
I also have a LED sparkler light which I use when I want to bring some sparkle into faceted stones. A LED flash light would be a low cost option.

Bringing out some sparkles in diamonds with LED lights


I prefer dark backgrounds for my photos. They create a nice high contrast to the light silver colors of my jewelry. I was never able to photograph well on white backgrounds. It usually just looked washed out. I usually don't use any props like rocks, twigs or any other item. It just does not work well for my designs and distracts too much from it.


photo setup for gray gradient reflective backgrounds

I mostly use a gradient background now. It allows me to vary the darkness of my background. If I need a slightly lighter background to bring out some stone colors I photograph the object closer to the front. If I need a darker background, I slide the paper a bit forward and photograph over a darker portion of the gradient paper. The paper is laid on the bottom of the tent and wraps up in the back to create a seamless background. To protect the paper from scratches, dirt and to get a reflection of the piece on the ground I use a glass plane elevated on some boxes. This softens the background and the paper last longer. I prefer glass over plexy as it does not scratch as easy and it's easy to clean with some Windex. It's just a non-glare glass I took out of a cheap picture frame. If one prefers a colored background, it's pretty easy to replace the gradient background with any colored paper of your choice. One disadvantage of dark background is that they show every little dust particle that makes it into the shot. And they always are in there no matter how well one cleans everything. It's pretty much always required to do some retouching in a photo editing program to get rid of those.

To stand objects like ring up I use an adhesive putty. A tiny rolled up bead placed under the shank of the ring works wonders. Try to make the bead small enough so it does not show in the photo, it's easier on wider ring shanks of course. Alternatively a soft wax like micro-crystalline wax can also be used but it often leaves a residue on the glass which then needs to get cleaned again. The putty is not as sticky as wax but also cleans easier from the class and barely leaves any residue.

Standing a ring up with the help of some adhesive putty

For small objects like rings I use a 40mm macro lens which creates a blur in the background with a sharp focus on the front. It makes the picture very 3 dimensional. Plus I can get pretty close to the object without looking focus. When I need a wider focus field for larger objects like bracelets I use a 18-55mm lens.  The camera is set on either the macro setting or I also use some manual settings to allow more control over the apertures.

I shoot everything in RAW format and always multiple views of the object from different angles. To get 5 nice shots I go though at least 20 to 50 pictures to select the best angles. Those selected pictures go through some Photoshop adjustments.

In the RAW format editor I adjust the white balance as needed, crop the image and adjust some light levels and contrast. It then gets imported into Photoshop. Nice thing about the RAW format is that It always keep all the original imformation available in case I have to go back to use the same picture for other adjustments again. Bad thing is that RAW images are large files and will clock up your computer memory quickly.

Once in Photoshop I sharpen the photo, take out any noise like dust particles via the heal function, adjust any colors as needed to reflect the true colors of the piece and do some fine tuning of the contrast via the curves function. The goal is to make the image be a true reflection of the piece, not to make it look better or worse than it really is. So go easy on adjustments. It's a fine line between having great real looking photos to looking fake.  In my first years those adjustments took forever but now I pretty much have my routine set and it only takes a minute or so to run through it. Time still adds up and is something to be considered in the pricing of your work.

Please read the tips and tricks other members employ to get their stunning photos:

Lou Hunter: http://peculiarforest.blogspot.fr/
Laura Jane Bouton http://laurajanebouton.blogspot.it/
2Roses: http://www.jewelrytutorial.blogspot.com
Chrysoula: http://jewellietta.blogspot.gr
Deborah Lee Taylor: http://www.e5jewelryblog.com
Abella Blue: http://www.abellablue.com/blog
Evelyn Markasky http://www.evelynmarkasky.com/blog.html


.

Brooch A Day - Printed Steel Rosettes

| |
The first month of the year is almost done and the brooch a week challenge has been fun so far. Last week I finally received the 3D printed week 1 rosette models from Shapeways.
It's always interesting to see the printed outcome. I did add some pins to the back to be able to wear them as brooches and pin them to the large canvas I hung up on the wall. It will be so much fun seeing all those hundreds of brooches on that canvas at the end of the year. Walking by that canvas everyday keeps me on track and serves as an instant inspiration board.

The design process via Rhino3D and Grasshopper modelling was explained in the last post.
All (except the Anemone Rosette design) were printed in bronze infused stainless steel which has always a nice texture from the printing process.

BAD-001 3D printed Rosette Brooch
BAD-001 Rosette 3D printed stainless steel, 32mm diameter, 3mm thick, designed in Rhino3D and Grasshopper

BAD-001 3D printed Rosette Brooch_9633
BAD-002 Rosette with denser elliptical shapes
To test I also had these 2 rosettes printed a bit larger in the smooth plastic material (polished white plastic and a set in coral red). But the details don't come out well with that material, expesially for the denser design on the right. The shapes have no refinement and bleed too much into each other. It seems to work better if there is some empty space around the printed sections (see at the end of the post below). BTW: the coral red does not look red to me but rather hot pink. It certainly gets some attention.

BAD-001 & BAD-002 3D printed Rosette Brooch
BAD-001 and 002 printed in laser sintered nylon plastic dyed coral red, nickel pin in back, 43mm diameter each

Looking at the printed circle brooches it's apparent that the detail on the printed steel can't match the detail I get from milling in wax. But neverless it's quite interesting.

BAD-004 Circle Rosette 3D printed
BAD-004  Circle Rosette Brooch: 3D printed stainless steel, 30mm diameter, 3mm thick

BAD-003 & 004 Circle Rosettes 3D printed
BAD-003 & 004 Circle Rosettes

BAD-005 Pyramid Rosettes, 3D printed
BAD-005 two versions of the Pyramid Rosette brooch in steel
BAD-007 Daisy Rosette, 3D printed
BAD-007 Daisy Flower Brooch in steel
BAD Brooch rosettes week 1, 3D printed stseel
All printed stainless steel rosettes
I knew the "tentacles" of the anemone rosette (BAD-006) would be too thin for the steel printing. I did have it print in the coral red plastic instead. This allowed me to print with a larger larger diameter and more height without getting it too heavy and being so expensive. The stainless steel printing can get quite costly, I have to say. I think I will switch more to the plastic versions where appropiate. Otherwise I will be broke making 352 brooches in steel.

BAD-006 Rosette Anemone front, 3D printed Plastic
Anemone rosette, laser sintered nylon plastic,  dyed coral red for some more craziness, 41mm diameter, 15mm high

BAD-006 Rosette Anemone side, 3D printed Plastic
The depth it pretty nice.

BAD-006 Rosette Anemone back, 3D printed Plastic
Back side with stainless steel pin

This weekend I have to make the printing files for the models from the last 2 weeks and send them off to Shapeways for printing. At least now I have a better feel for some of the material properties.


.

Brooch A Day First Week: Rosettes

| |
We are now a couple days into the BAD ( Brooch A Day) challenge and it has been fun so far. It is really liberating to think outside of the "ring making box". Brooches seems to offer lot's of design freedom. It's all very playful so far. I am trying to use the blogging as a way to keep a journal of the process. So bare with me if this gets a bit technical at times.

To dive into learning Grasshopper software I watched lot's of video tutorials to get familiar with the possibilities it offers. The first week was all about rosette designs.

BAD Week 1 brooch wax models
Wax models of week one rosette designs, CNC milled
I followed a video tutorial that outlines the grasshopper definition setup for rosette creation.

rosette-definition
Grasshopper definition
By switching the geometry shape of the item that gets rotated and scaled, it generates lot's of different designs from the same base definition. Playing with the sliders was really fun. I love watching how the designs evolve dramatically when certain variables change.


BAD-001 & BAD-002 rosette-ellipse1-elev
Variations of a rosette by deleting certain elements and changing the depth.

The first 2 rosette designs where done by rotating a elliptical solid and down scaling it towards the center. Once the right rotation, density and scale factors were found, I took that into Rhino and started to manipulate it further.  To test it I also milled those designs in wax on my CMC mill. Ultimately the designs will be sent out for 3d printing in stainless steel. But since I have a mill I can at least do a test the same day to check the design. It's somewhat easier to evaluate a design if I can see and feel it. Just judging from renderings can lead to some surprises.

BAD-001 Milled Wax Rosette
Single layer rosette, CNC milled wax, can be cast in silver

BAD-002 CNC milled wax
Double layer rosette, CNC milled wax
BAD-002 rosette-ellipse2-front-back2jpg
Rendering of double layer rosette with added brooch pin

The next 2 designs used a circular shape instead of the elliptical. The look is very different. The difference between those 2 are just changing the radial density from 9 circles around the center to 15.  
rosette-circles2
Rendering
Circle Rosette brooch models
CNC milled wax models

Next day I started to play with some pyramid shapes.


Screen shot grasshopper
Testing settings in Rhino and Grasshopper

BAD-005 Rendering Pyramid Rosettes, BAW52/1
2 designs, same 5 sides pyramid as a base shape but changing the rotation of the shape around the pyramid center axis yields a different design

BAD-005 / BAW52/1 Pyramid Rosette testing with CNC milled wax models
CNC milled wax model. The first test model had very thin areas in those valleys that would not print and even brake during casting.
Day six was a fun one! It crashed my computer a couple times. But it finally worked, well virtually.  The base shape was a weird morphed shape that looked like a crippled joy stick. Once used in the definitions it created some wonderful shapes and reliefs.
The rosette looked like a sea anemone and was quite complex. It can only really be 3D printed as it has undercuts. The wax model I milled just does not have the same detail. Unfortunately  for the stainless steel it's too filigrane and it got rejected by Shapeways. It can probaly only printed in the high-res plastics. So no steel version of this one :(

BAD-006 Wax front
"Sea Anemone" rosette wax model, CNC milled
BAD-006 Rosette Anemone back
Rendering, even the back has a interesting texture. If the rosette would be stainless steel using a magnet pin would allow to show off both sides.

Next day a slightly different base shape than the eliptical one from day one and 2. This series shows how playing with the sliders is a great way to get different designs very quickly. The only difference is the rotation of the shape.


BAD-007 Grasshopper Screenshots5
BAD-007 Grasshopper Screenshot4
BAD-007 Grasshopper Screenshot3
BAD-007 Grasshopper Screenshot2

BAD-007_rendering-daisy-rosette
Rendering
BAD-007
CNC milled wax model


Once I get the 3D printed steel models I can just weld or solder some pin findings to the back to make them into wearable brooches. I also thought using a magnet would be fun as then the steel rosettes can be worn 2 sided.  Some have a really interesting texture in the back that ought be be shown off.

I fabricated this little magnet pin out of textured and oxidized sterling silver with a pin clutch. The final version should be made out of 3D printed steel. The strong magnet was from the hardware store.

BAD-008 Magnet Brooch
Day 8 brooch: Magnet pin
It's a very handy tool that I will keep pinned to my apron as I can use it to clean out the broken saw blades out of my previous metal filings in the bench drawer.

BAD-008 Saw Blade Pin
Day 8: Broken Saw Blade Pin Brooch

Those were the first 8 days.

The last 2 days of the challenge I used some found objects and make them into brooches.

I am waiting for my new PC to arrive on Friday to start with a new Grasshopper definition. Little spoiler: there will be some bees or wasps involved in the new design. 


.


Etsymetal Blog Carnival: New Years Resolution

| |
The change of the year always comes with some reflections on the past 12 month and what the new year should bring.
I am really happy how 2012 turned out and don't think I need to do any drastic changes with my business. Things are going in the right direction and I will just keep refining them. That might be developing a few new designs and getting rid of some old ones I am tired of making. I also hope to find time to take some professional classes to refine my skills or acquire a few new ones. The first one will be a stone setting class in a few weeks to learn some new tricks and tips from the masters.


A couple moissanite rings completed in 2012


I am also teaching myself a new CAD software and hope this leads to new explorations. More info on this and the brooch making challenge can be found in last weeks post. The first couple days of this Brooch A Day challenge have been fun so far. Can't wait to see what new inspirations I get out of this.

Overall I think 2013 will just be a year for refining my business and my life and maybe even find more balance and free time to do other things.

Feel free to check out New Year's resolutions of other Etsymetal Member's

Lou Hunter http://peculiarforest.blogspot.com
Laura Jane Bouton http://laurajanebouton.blogspot.it/
2Roses: http://www.jewelrytutorial.blogspot.com
deborahleetaylor: http://www.e5jewelryblog.com
Mary Anne Karren: http://silverpearlmetalworks.wordpress.com/
Theresa Kwong: http://tkmetalarts.blogspot.com
Danielle Miller: http://daniellemillerjewelry.blogspot.com/
Silentgoddess: http://silentgoddess.blogspot.com


.

2013 Year of the Grasshopper and Making Brooches

| |
Happy New Year! 2013 will be the year of the Grasshopper for me. No, I did not invent a new animal sign for a Chinese Year. It's just my motto for this year. Grasshopper is a plugin for a 3D modelling software Rhinoceros and one I want to learn. So this year my resolution is to play with it as much as I can. To help me stay on track I use the same motivator I used 2 years ago to learn Rhino 3D: I joined a flickr group to create a Brooch a Bay (BAD) or Brooch a Week (BAW). Anyone can join and submit designs. It's a personal challenge and open to interpretation as long as it is some sort of brooch, pin or badge.

In 2011 I did the Ring a Week challenge by designing and modelling 1 ring design per week in Rhino. I only went up to 32 weeks and got sidetracked with ... well live.  But it was still successful and I eventually learned the software. It is now a part of my everyday work and allows me to create a few of my selling ring designs. Posting the learning results to flickr and blogging about it was a great way to see the progress and change in complexity during the year. Plus it serves as a form of journal. What worked once, could work again.

rosette-definition
Grasshopper definition for first brooch project


Grasshopper is a free software plugin for Rhino 3D geared towards parametric form generation. It allows exploring shapes and designs through algorithms. It's often used in complex architectural designs but also in lot's of other design applications. I have seen it in action in my former day job as an architect used by those nerdy computer kids. But I haven't actually used it myself. It's a great tool to explore options and variations of designs, shapes and patterns. It allows making instant changes without having to remodel everything. It should be a awesome tool for jewelry applications and especially brooches that allow more flexibility than rings.

Brooches can really be anything that can get attached to clothing. As long as it has a pin of some sort - it's a brooch. I have never made a brooch and probably have never even worn one, ok maybe some pins or badges long time ago. I am excited to get out of my ring making comfort zone and explore another medium a bit. Brooches will allow me to play with patterns, reliefs, shapes and forms that would not be suitable for other jewelry applications.

BAD2013-001 & BAD2013-002 rosette-ellipse1-elev
Variations of a Rosette design, Rendering


I am not sure yet if I will follow through with the daily BAD challenge but I will try. Since Grasshopper allows creation of design variations I can use those spin offs as each days submission. I am hoping to create a mini series each week and post the best brooch design in the weekly challenge.  It will start out with renderings first. I will also send out files to Shapeways to be 3D printed in stainless steel or plastic/ resins or if appropriate mill them on my CNC mill and cast in silver. With any of these production methods there is a lag time of 2 to 3 weeks between the design and having the milled/cast or printed object in my hand. Once there is a physical object I can attach pin findings to it to make it a brooch or pin.

Modelling in Rhino and Grasshopper


I really see this challenge as a learning experience and to some extent as an art project. I have no intent to sell these brooches (through if something amazing comes along I might eventually add them in my shop).  I am just looking forward to some playful explorations and extending my design repertoire. It will be inevitable that I get stuck with the software, sidetracked with life and too busy with my business. But I hope I can always return and play some more. You can follow along on Flickr and I will try to blog off and on.

One of the first things I need to do is buying a new computer. I crashed the program multiple times this week while just playing with some simple definitions. So far I used Rhino4 via Paralles on my MAC book pro. It worked ok for some simpler ring designs but I already started to have problems with modelling bracelets as the files got bigger and bigger.  It's time to to upgrade to a dedicated PC and the newer software. I was hoping they would develop the MAC version of Rhino a bit faster but I don't really see that happen anytime soon (Rhino is available for MAC but no plugins like T-splines or Grasshopper yet). So I am out PC computer shopping. It's not my favorite thing to do, Mac shopping would be a lot more fun. 


Related Posts with Thumbnails