Making of Custom Square Rings, Part 2

| |
I did finish the ring set for the Square 1 engagement/ wedding rings a couple weeks ago. I hope the groom to be already proposed so my post won't ruin the surprise. For a description of the first part in making these custom rings that used CAD 3D modeling see this post.

RAW52/24

The rings cleaned up easily after  the casting and the settings were so perfect that the stones went in smoothly. It's always such a treat to set something in 18k gold instead of 14k. The higher carat gold is so much softer and easier to bent against the stone. And the color is such a treat to the eye.

I love how the earth colored diamonds complement so well the warm colors of the 18K gold and the orange and green sapphire. Unfortunately the customer did not expect the diamonds to come in a range of colors. They had not seen my other listings and photos that show the entire earthy color range. They only looked at one photo that shows the ring set with one gray cube. I was asked to replace the colored stones with all light gray diamond cubes.

Lesson learned that there is never enough communication when it comes to custom orders. Something that is obvious to me might not be so obvious to the customer. Since the main goal is to have a happy customer, I had to do some research. It took me 2 weeks to actually find a couple more gray cubes in that particular size and in nice shapes.

Not all rough diamond cubes are perfectly shaped as a cube. They really are rough, they don't come all in the same even size like callibarted man-cut gem stones. Nature just does not work like that. To actually get a good set of 5 matching cubes I had do order a lot of more than 20 stones and then try each in the setting until I has happy with the combination.

DSC_9786

The 18k setting fortunately was soft enough so I got all those colored diamond out without having to cut open the gold setting and having to solder a new setting one on.

DSC_9757

Here the set with the all gray rough diamonds cubes. 

I did use the rings as my submission for the RAW challenge and they became # 23 and #24. I also created some settings for 1, 3 and 4 stones. I will list those in my shop as I still find the off center setting with fewer cubes more intriguing than the row of 5 diamonds. This one will always be special for that happy couple.
.

Botanicals - Bark

| |
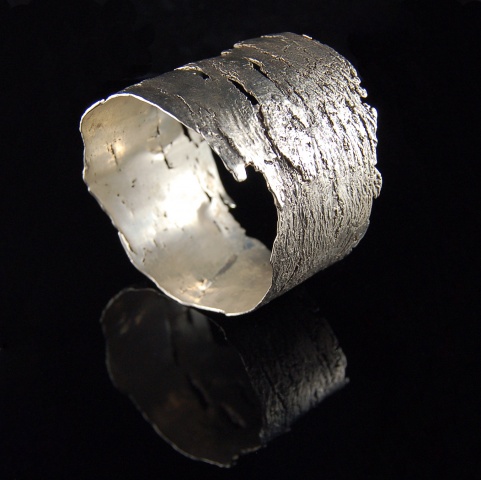
Some years ago I started casting bark into jewelry pieces, mostly bracelets.  This bracelet was the first of those. It's to this date the only bracelet I was totally happy about the outcome.


Since then I tried a few more, but often the castings did not come out right. The issue seems to be to find just the right  thickness and density of the bark that will not get eaten up by the investment during casting and allows the hot metal to completely fill in the form. During the casting process a plaster type mix is used to create a negative hollow form of the bark piece. Bark is very porous and I believe the investment (plaster) enters into these pores and clogs the path of the hot metal. If the bark is to thick, the bracelet will be to heavy to wear and cost way to much.
Anyways, one that actually cast right was this bracelet.


The texture and details came out nice. But the bracelet is very big (7cm diameter) and does not sit well on a wrist. I probably need to modify it a bit by cutting it open at the overlapping seam and make it a bit smaller.  

The bark that I use for these comes from an Eucalyptus tree. After a good rain storm I can  find pieces of bark that fell of the trees in my neighborhood like this one.  If they are still wet from the rain I form them immediately into bracelet shapes and let them dry. 
I have a fill box of those dried pieces around that are just waiting to get cast.

Box of bark pieces, twigs, leaves, seeds and other organic goodies. 

Unfortunatly the rising cost of silver put a bit of a stop into the bracelet casting. There is so much metal in one of these bracelets that I just can't afford to play around too much. But eventually I will give it a try again in the future. Maybe I try some bark rings instead.

.

Crazy Challenges are Good

| |
I signed up for a new challenge! Not that I am not challenged enough, but sometimes I just crave a bit more of it. Especially the the type of "there-is-no-way-I-can-do-this" challenge is intriguing. Life would be boring without those. That is why I signed up for the T-Spline Design Contest.


Submissions to contest in categories Architecture, Transit, Jewelry, Consumer Products and Miscellaneous are due on August, 9th. Gosh, that is in only 4 weeks!!!!! But deadlines are good too for me. But I am still a total beginner at this and have no clue at all how to even use it correctly. And I have to come up with a world changing design on top of it. Ok, it does not need to change the world but just make it a better place. I guess I am just competing for the last place in the jewelry category. Participation is everything, right?
I better get my thinking hat on this weekend and really get a hang of the software.  Will watch T-Spline tutorials for hours.:) And I have to also learn V-Ray to be able to render my "better world" design. Double or triple challenge! Yeah!

.

RAW52 #9 to #13 & #17- Elliptical Loft Rings

| |
I am cheating a bit with my RAW submissions by using slight variations of the same design for multiple weekly entries. After all the final outcome is still multiple "different" rings. Small lies sometime help to stay in the game. If I would feel like being more than 10 weeks behind, I would probably just give up on this challenge. I am basically just cheating my brain a bit. So far it seems to work as I still continue to play with  the software and come up with some  new designs when creativity strikes and time permits.

RAW52/17 various


RAW #9 to #13 design was done by lofting ellipses and then flowed over a ring tube surface of different width to make the various ring width from 3 to 15 mm.

RAW52, raw-09 to raw-13
Here the screen shot from Rhino.

RAW52/17
RAW52/17
Rings were 3D printed by Ponoko in white plastic.

RAW52/17
I attached casting wax sprues (gates) to the insides of the rings to maintain the printing texture on the outside face and cast it in Sterling silver. The inside of the rings was sanded after that and polished, the outside was just lightly polished and tumbled.

RAW52/17 row

Silver rings in various widths.

RAW52/17 stack


Love the layered texture from 3D printing process.


RAW52/17 medium stack

The middle ring was oxidized  with LOS.

RAW52/17 zebra
Rings can be worn stacked together.

I think the narrower rings have some potential but the design needs to be cleaned up a bit. The very wide ring is a bit too wide to be comfortable.


Botanicals - Palm Twigs

| |
Every time I walk my dogs though the neighborhood, I am looking out for some new botanical finds. Best treasures are found after a windy night. Under one of those tall palm trees that are so commonly found along LA's side streets (don't ask me what kind they are) I found some twigs that looked perfect for my next botanical ring experiment.


I cut about 6cm lenghts from a couple twigs and cast it directly in Sterling Silver without making a mold first. The straight sections came out nice.  Then I bent it in a forming block into a ring shape and soldered the ends. Somehow the texture changed a bit when forming them round. When forming straight sections into curved pieces  the outer surface stretches a bit while the inside face of a ring gets a bit contracted. 
Still overall the texture with all those little nods is pretty interesting. I could imagine setting little stones in those nods. I have a couple tiny green diamonds that could complement great the nature feel of these rings.


Palm twigs
Beautiful image by Dick D'Agostino of palm twigs. Mine where just not as bleached from the sun and sea yet.


I found a shorter palm with a bundle of those twiggy things in another part of my neighborhood. 
Not sure if those "twigs" are technically twigs or rather  flower stems. 

Here a story about palm tees in Los Angeles and a picture of the one in my neighborhood.  What kind is that one?
The palm I found my twigs under.


RAW52 #8 and #18 - Loft Ring

| |
I just organized my RAW submissions on Flickr again. I am still a couple weeks behind with my weekly challenge but hopefully I am on a roll again for a couple more.
Here is a lofty ring I finished a couple weeks ago but never blogged about:

RAW52/08

Playing with simple lofting for this wonky ring. It looks a bit like an endless worm.


I also sent out some designs for 3d printing at Ponoko. Not all modeled ring designs were suitable for printing. Some had areas that were too thin or the model was not clean.

This lofted design looks like this in 3d printed white ABS plastic and became my #18 RAW ring (sorry I am jumping ahead a bit).

RAW52/18


It's probably not a design I will keep making more in the future but it was a nice experiment.

Botanicals - Pine Twigs

| |
I grew up with a lot of pine trees around. My German  home state Brandenburg, the area around Berlin, has some of the most extensive pine forest in Europe. As a kid I used to climb these trees at our summer home and some winters we even walked in the forrest and picked out a pine tree as a christmas tree.
Now I have a huge pine tree in the back yard of my Los Angeles home. It brings back old childhood memories. It also creates a constant mess in the yard. Pine needles everywhere.
To turn the mess into something nice I started my own little project. I picked some dry twigs from our tree and made rings out of them.


The first set I did by pressing the twigs in a molding clay and creating wax replicas. The advantage was that one side if the resulting wax rod was already smooth and almost perfect for the inside of the rings. Some texture gets lost this way, but the outcome was still amazingly detailed.


For the second test I did cast the wooden twigs  directly without molding them first. 

The twigs were attached with wax to rubber sprue base before plaster investing and burn out. 

Twigs right after casting. There is still some investment in the recesses.

Cast Sterling Silver twigs

After casting I formed them in a forming block to a ring and soldered the ends together. The insides were smoothed out a bit. Oxidation was applied with Liver of Sulfur  and then lightly polished to just leave the black in the recesses. 

I love to just stare at the rustic texture and admire the beautiful nature of the twigs. I am not planning to offer those rings in my store but rather treat this as my own little science project to explore  the beauty of botanical things. I did some other test with different twigs and bark too. So stay tuned for more botanical inspired posts.


Summer Treat: Watermelon

| |
Happy 4th of July weekend! When I think of summer treats, watermelon comes to my mind. Nothing refreshes better on a hot day than those juicy and sweet tasty slices of fruit.


And the color combo of green and pink is just delightful. No wonder that watermelon tourmalines are my new favorite eye candy. I recently got a bunch of rose cut tourmalines in beautiful shades of green and pink. 


Tourmaline is a gemstone that sometimes contains more than one color. Watermelon Tourmaline is a unusual and rare variety of tourmaline. The coloring resembles the pink flesh and green rind of a watermelon. They are frequently sold as slices with the pink in the center and green shade all around. The colors occur naturally in tourmalines and gems are not treated. The rose cut stone I got are mostly bi-color stones in different shapes and sizes. 

Here a couple more tourmalines.

I set one of those rose cut tourmalines in a 14karat gold bezel on a sterling silver freeform shaped ring.


Related Posts with Thumbnails